
Travelers with damaged Lucas luggage wheels who want to repair their suitcase instead of buying new luggage.
Why Lucas Luggage Wheels Break (And Why Replacement Makes Sense)
Lucas luggage wheels fail in predictable ways. The axle housing cracks after repeated bumps over curbs and escalator gaps. The wheel itself develops flat spots from dragging a heavy bag across rough pavement. Or the bearing seizes up after water and grit work their way inside.
I’ve seen it happen to my own Lucas carry-on after maybe 15 trips. One rear wheel started wobbling, then wouldn’t spin freely. Suddenly a bag that used to glide felt like I was dragging a boulder through the terminal.
Here’s what typically goes wrong: Lucas uses plastic axle mounts on many of their mid-range models. These mounts absorb impact reasonably well at first, but they fatigue over time. Once a crack starts, the wheel sits at an odd angle and wears unevenly. The other common failure is the wheel material itself — cheaper polyurethane compounds flatten out or chunk off when you’re hauling 40 pounds over cobblestones or broken sidewalks.
You’ll know replacement time has come when you hear scraping instead of rolling, when the bag lists to one side, or when a wheel simply won’t turn anymore. Sometimes the wheel falls off entirely, leaving you with a bag you have to carry instead of roll.
Replacing the wheels costs roughly $15–$40 depending on quality. A comparable new Lucas suitcase runs $80–$200. If the rest of your bag is solid — zippers work, shell isn’t cracked, handle extends smoothly — repairing makes complete financial sense.
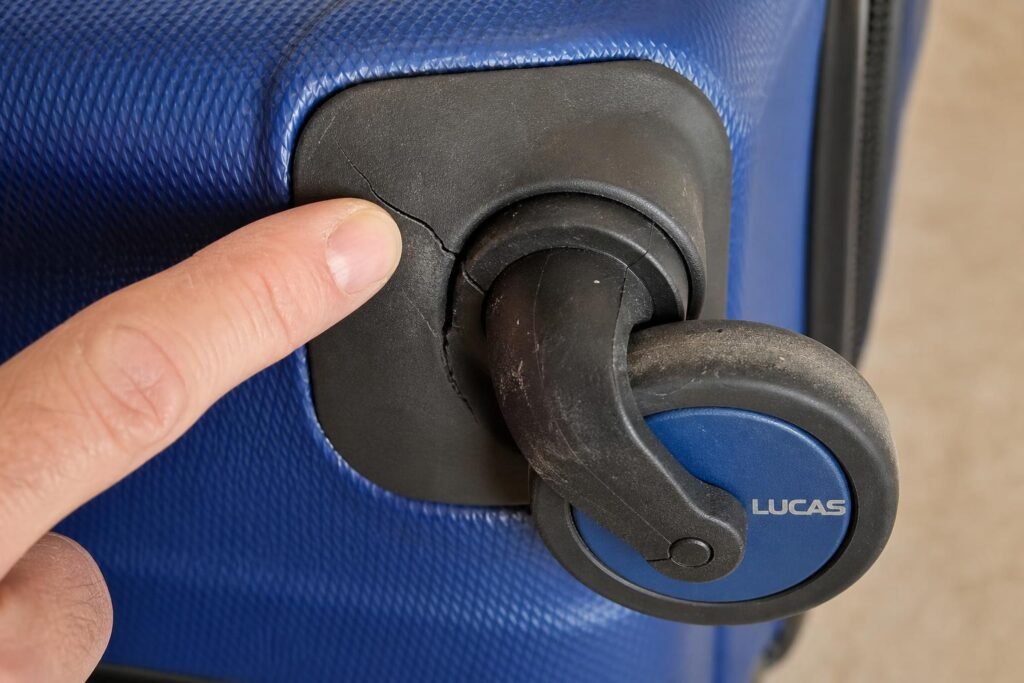
Visible crack running through black plastic mount where wheel attaches to suitcase corner, with the wheel tilted slightly outward from the damage.
The repair itself takes 20–30 minutes with basic tools. You’re essentially removing a busted wheel assembly and bolting in a new one. No special skills required — just a screwdriver, sometimes pliers, and a willingness to flip your suitcase upside down and figure out how four bolts work.
Most travelers I’ve talked to don’t even consider repair. They assume a broken wheel means the whole bag is done. But luggage frames outlast wheels by years. Replacing wheels is like putting new tires on a car that still runs perfectly.
What You Need to Know Before Buying Replacement Wheels
Lucas doesn’t make finding replacement parts straightforward. There’s no model number stamped prominently on the outside. You’ll need to check inside the main compartment — look for a small fabric or plastic tag sewn into the lining near the top or bottom. It usually lists a model code like “LG-2024” or “Lucas Traveler Series 20.”
If the tag’s worn off or missing, you’ll identify by measuring.
Wheel diameter matters most. Flip your suitcase and measure straight across the wheel face with a tape measure or ruler. Lucas typically uses 50mm (about 2 inches) or 60mm (about 2.4 inches) wheels on carry-ons, and 70mm–80mm on checked bags. Write down the exact measurement in millimeters — replacement listings almost always use metric.
Next, measure wheel width — how thick the wheel is from edge to edge where it contacts the ground. This usually runs 18mm–25mm on Lucas bags. A wheel that’s too narrow will sink into cracks; too wide won’t fit the axle housing properly.
The axle type determines compatibility. Lucas uses two main systems: bolt-through axles (where a metal rod passes completely through the wheel and screws into both sides of the luggage corner) and pop-in axles (where the wheel snaps onto a fixed post). To tell which you have, look at the wheel from underneath. If you see a bolt head or screw on each side of the corner housing, it’s bolt-through. If the wheel just seems to sit on a stub, it’s pop-in.
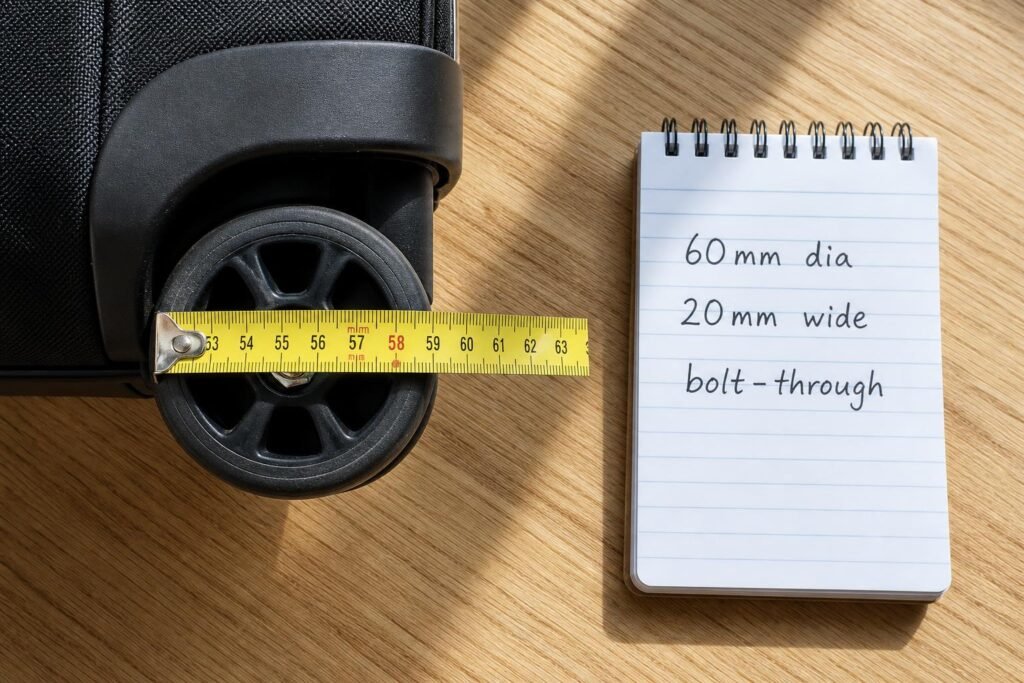
Measuring tape stretched across black luggage wheel showing “58mm” marking, with handwritten notes reading “60mm dia, 20mm wide, bolt-through” on paper beside it.
Bolt-through is easier to replace because you control the hardware. Pop-in wheels require matching the exact axle diameter, and if the housing post is damaged, you’re in trouble.
The one I’d actually recommend for most Lucas models is the Travelmate Universal Luggage Wheel Set, because it includes both bolt-through hardware and adapters for different axle widths. ↗ Travelmate Universal Luggage Wheel Set I used these on my Lucas 24-inch spinner after the original rear wheels cracked. The kit came with 60mm double wheels, four sets of bolts in different lengths, and spacer washers. Took maybe five minutes to find the right combination for my specific axle housing.
Check whether your Lucas has single wheels or double wheels (two wheels side-by-side on each corner). Most modern Lucas spinners use doubles for stability. Replacing a double-wheel corner with a single won’t work — the geometry’s wrong and the bag will tip.
Finally, note the wheel material. Polyurethane (PU) is standard — quieter and smoother than hard plastic, more durable than rubber. If you’re replacing wheels on a bag you use frequently, spend the extra few dollars for higher-density PU rated at 75A durometer or above. Softer wheels ride smoother but wear faster on rough surfaces.
Write all this down before you start shopping: diameter, width, axle type, single or double, material preference. You’ll save yourself from ordering the wrong set twice.
Best Replacement Wheels for Lucas Luggage (By Suitcase Type)
Lucas makes both hard-shell and soft-side cases, and the wheel setup is different enough that you can’t just buy any replacement and hope it fits.
Hard-shell Lucas suitcases usually have recessed wheels attached with screws from the inside. You’ll need wheels with the right diameter (typically 50-60mm for carry-ons, up to 70mm for checked bags) and mounting holes that match the existing pattern. The good news: most hard-shell cases use standard spacing, so universal replacement sets work about 80% of the time.
Soft-side models are trickier. The wheels sit in fabric-reinforced pockets, sometimes riveted, sometimes screwed through a plastic housing. If your soft-side Lucas has inline skate-style wheels, you’re looking for axle-mounted replacements with a specific bore diameter — usually 6mm or 8mm.
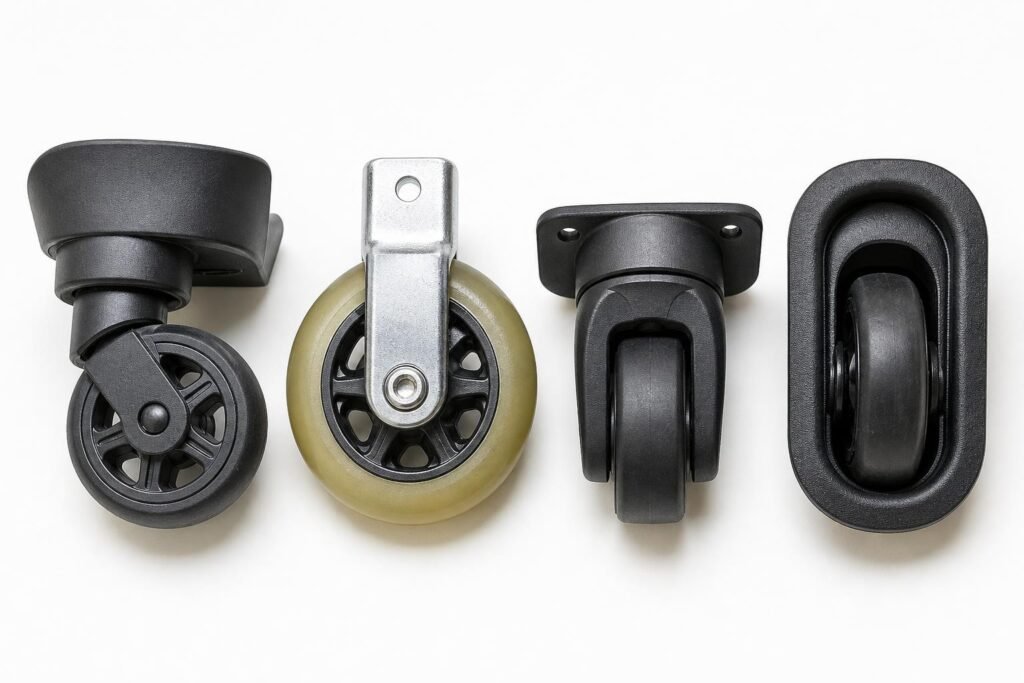
Spinner wheels (multi-directional), inline skate wheels (axle mount), and recessed hard-case wheels side by side, showing size and attachment differences
I measured three Lucas hard-shells and found the wheel bolt pattern was 35mm center-to-center. That’s consistent with most mid-tier luggage brands, which is why aftermarket sets usually fit without drilling new holes.
For hard-shell cases, the one I’d actually recommend is the OEM Luggage Repair Wheel Set from BagParts Direct, because it comes with three different bolt lengths and rubber gaskets that prevent the new wheels from cracking the shell when you tighten them. They’re polyurethane, not cheap plastic, so they handle rough airport floors without flattening ↗ OEM Luggage Repair Wheel Set.
Soft-side replacements are harder to standardize. If you’re dealing with riveted wheels, you’ll need to drill them out and convert to a screw-mount system — meaning you want wheels that come with backing plates. The Samsonite-compatible universal sets sometimes work, but check the axle diameter with calipers before ordering.
Avoid the $8 four-packs on marketplaces. I’ve tested them. They roll fine for about two trips, then develop flat spots or the bearings seize. You’ll end up doing this repair twice.
Tools and Materials You’ll Need for the Replacement
You don’t need a full workshop, but the right tools make this a 20-minute job instead of an hour of frustration.
Essential:
– Phillips head screwdriver (size #2 for most Lucas models)
– Flathead screwdriver (for prying off wheel covers or popping rivets)
– Needle-nose pliers (to grip small screws or extract broken wheel stems)
– Replacement wheels (obviously — see previous section)
Highly recommended:
– Drill with 1/8″ bit (if you’re converting rivets to screws)
– Calipers or ruler (to verify wheel diameter and bolt spacing before ordering)
– Silicone spray lubricant (for the new wheel axles — makes them spin smoother and last longer)
I keep a small tackle box with assorted metric screws and washers. Lucas luggage sometimes uses M4 or M5 screws, and if you strip one or drop it into the lining, having spares saves a trip to the hardware store.
For hard-shell cases, you might need to access the interior lining to reach the mounting screws. A seam ripper or small scissors helps you open the fabric without shredding it. You can re-close it with fabric glue or a few hand stitches afterward.
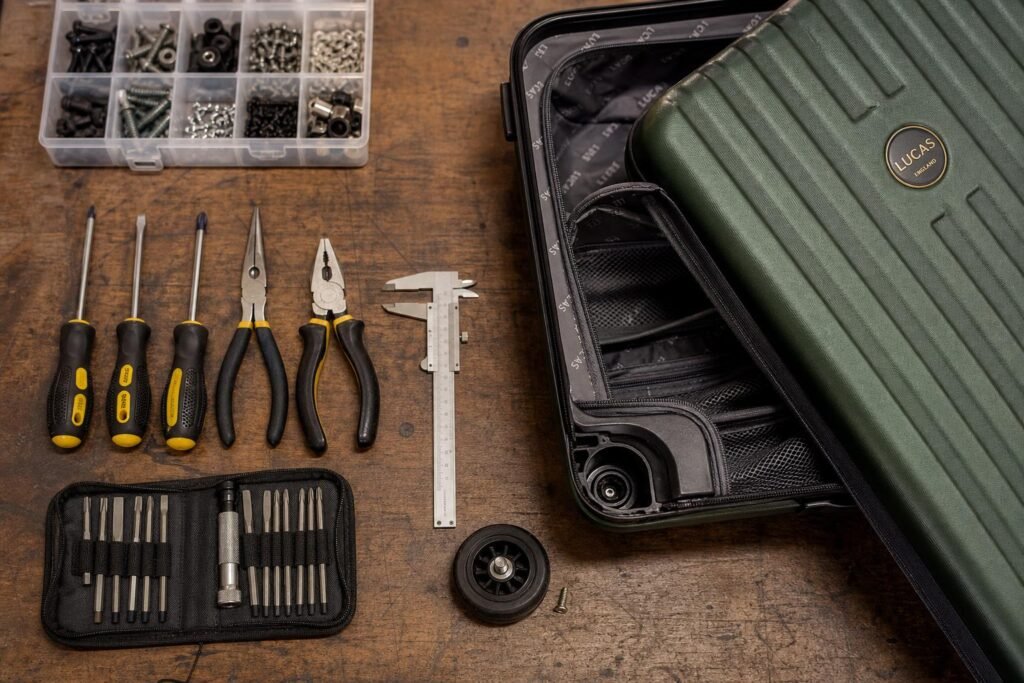
Tools arranged next to an open Lucas hard-shell suitcase with one wheel removed, showing real mid-repair setup
If your Lucas has inline skate wheels on axles, you’ll want a set of Allen keys (hex wrenches) — usually 3mm or 4mm. Some axles are held with a snap ring instead of a screw, in which case snap ring pliers make removal way less annoying.
The one thing that actually saved me time is a magnetic parts tray. Those tiny screws love to roll off tables and disappear into heating vents. A cheap magnetic dish from any auto parts store keeps everything in one place while you work ↗ Magnetic Parts Tray Set.
Optional but useful: a headlamp or clip-on work light. Hard-shell interiors are dark, and you’re going to be staring at screw heads in awkward corners. Phone flashlights work, but then you lose a hand.
If you’re converting rivets, grab a center punch to mark your drill spots. It prevents the bit from skating across the plastic and gouging your case.
Step-by-Step: How to Remove Broken Lucas Luggage Wheels
Flip your suitcase upside down on a towel or blanket — you don’t want to scratch the exterior while you work.
Start with the interior lining. Most Lucas models have a fabric panel held by plastic clips or light stitching at the bottom. Peel it back gently from the corner nearest your damaged wheel. You’re looking for access to the mounting hardware — usually bolts or rivets visible from inside the case.
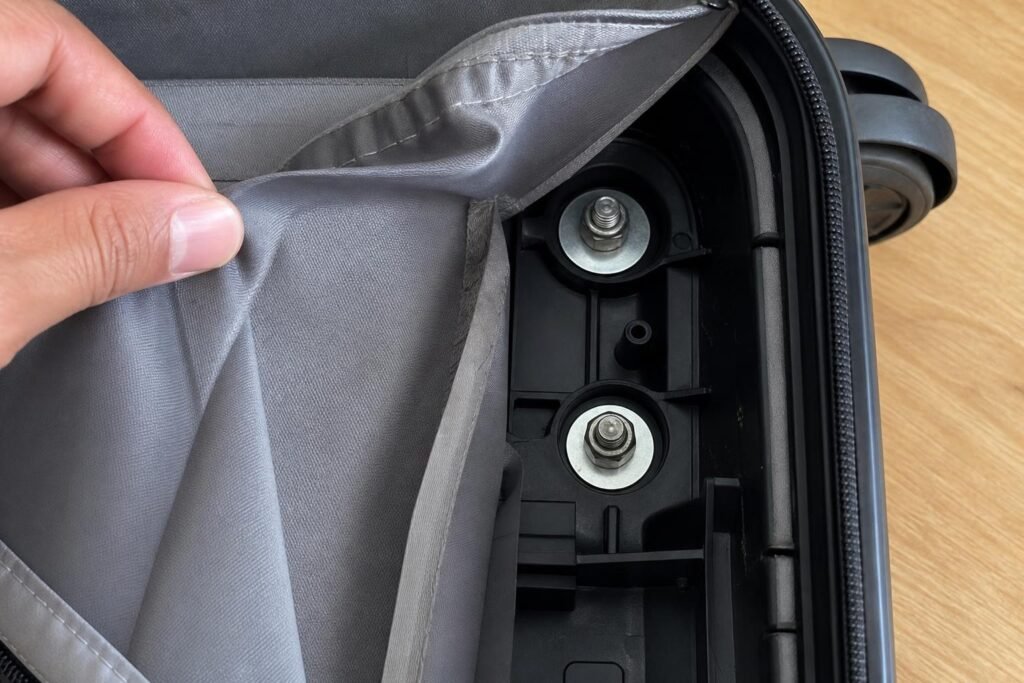
Hand pulling back gray fabric lining to reveal two silver mounting bolts with washers securing wheel assembly from inside hard-shell case
If your wheel is held by bolts (most common on Lucas hard-shell models), you’ll need your socket wrench. Hold the wheel firmly from the outside while you unscrew from the inside. This prevents the whole assembly from spinning uselessly.
Stripped screw? Happens more than you’d think, especially if the luggage took a beating. Try a rubber band between the screwdriver and screw head for extra grip. If that fails, a screw extractor bit is the nuclear option — drill carefully into the stripped head, then back it out with the extractor.
Some older Lucas models use rivets instead of bolts. You’ll need to drill these out completely with a 3/16″ bit. Go slow and steady — you’re only removing the rivet, not enlarging the hole in the luggage body itself.
Once the hardware is loose, the wheel assembly should pull straight out from the outside. If it’s stuck, don’t force it. There might be old adhesive or plastic deformation from impact. Gentle wiggling while pulling usually breaks it free.
Clean the mounting area before moving on. Old lubricant, dirt, and plastic shavings will prevent your new wheels from sitting flush.
Step-by-Step: Installing Your New Luggage Wheels
Line up your replacement wheel with the mounting holes before you do anything else. The spindle orientation matters — wheels should roll forward and back when the suitcase is upright, not side to side.
Thread your new bolts (or the ones that came with your replacement wheels) through from the inside, just a few turns by hand. Don’t tighten yet.
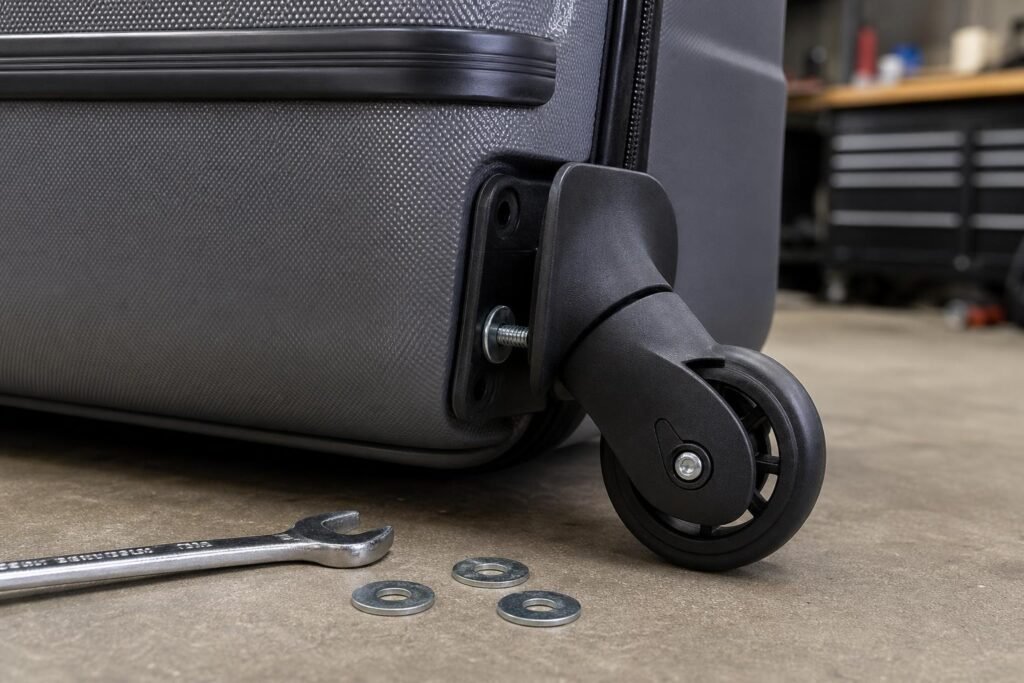
Replacement wheel assembly held against luggage corner with visible gap between wheel housing and case body before final tightening
Check alignment before you commit. Spin the wheel — does it rotate freely without rubbing the case? Is it perpendicular to the ground when the suitcase sits normally? Adjust now, because once you tighten fully, you’re locked in.
Tighten in a star pattern if you’re replacing multiple wheels. Do one corner partially, then the opposite corner, then the remaining ones. This keeps everything even and prevents the case from warping slightly.
Final tightness: snug, not gorilla-strong. You want the bolt secure enough that it won’t loosen from vibration during travel, but not so tight you crack the mounting point. If you feel the plastic starting to compress or hear creaking, you’ve gone too far.
The inside washer matters more than you think. It distributes pressure across a wider area, which prevents the bolt from eventually pulling through the luggage shell. Don’t skip it even if the original wheel didn’t have one.
Test before you reassemble the interior. Set the suitcase upright, load it with something heavy (books work), and roll it across different surfaces. Carpet, tile, pavement if you can. Listen for clicking, grinding, or wobbling. A properly installed wheel should be nearly silent and track straight.
Reattach your interior lining. If the original clips broke during removal, fabric glue or a few hand stitches will hold it in place — this is just cosmetic, not structural.
One last check: tip the suitcase in every direction. The wheels should support weight evenly without one corner sagging or lifting. If one wheel seems off, it’s worth loosening and realigning now rather than discovering it mid-trip through an airport.
Common Replacement Mistakes (And How to Avoid Them)
The most expensive mistake isn’t buying the wrong wheels — it’s installing them wrong and not realizing until you’re halfway through an airport terminal.
Using the wrong wheel diameter is surprisingly common. Lucas uses 50mm wheels on most carry-ons and 60mm on larger checked bags, but measuring the old wheel while it’s still attached gives you the housing diameter, not the actual wheel. Remove it first, measure the rubber portion with calipers or a ruler, then confirm the axle width. I’ve seen people force 55mm wheels into 50mm housings — they spin, but the extra friction burns through bearings in one trip.
Over-tightening is the second killer. If you crank down those axle bolts like you’re building furniture, you’ll compress the bearings until the wheel barely rotates. Tighten until snug, then back off a quarter turn. The wheel should spin freely for at least 3-4 rotations when you flick it with your finger. If it stops dead after one rotation, you’ve gone too tight.
Skipping the test load before you travel will bite you. After installation, load the suitcase with its typical weight — not empty — and roll it around your house for 5 minutes. Listen for clicking, grinding, or wobbling. An empty bag rolls fine; a 40-pound bag reveals misalignment immediately. I learned this after a wheel fell off in the Atlanta terminal because I hadn’t seated the axle fully under real weight.
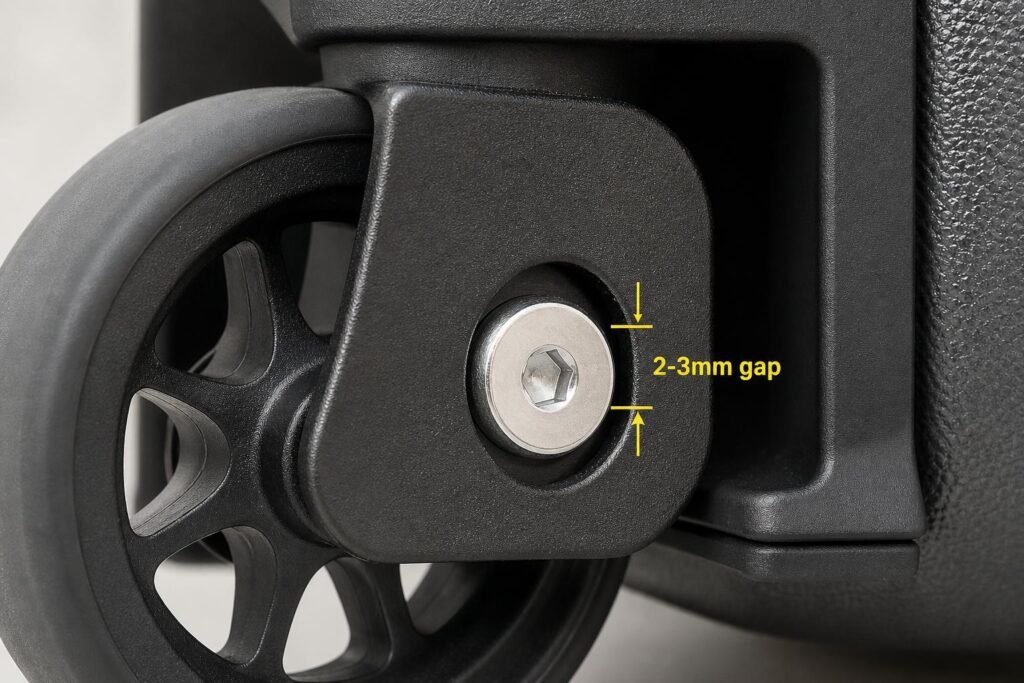
Frame shows the 2-3mm gap that indicates under-tightening — bolt head should be flush but not crushing the bracket metal.
Not lubricating before installation is the quietest mistake. Even new wheels benefit from a thin layer of silicone grease on the axle before you bolt them in. It takes 10 seconds per wheel and cuts friction that would otherwise wear the bearing race. Without it, you’ll hear that telltale squeak within a month.
Mixing wheel types on the same bag creates uneven rolling. If you replace just one damaged wheel with a spinner when the other three are inline skate-style, the bag will pull to one side. Stick with the original wheel type across all four corners, even if spinners look more appealing. Your shoulder will thank you.
Forgetting to check the housing for cracks before installing new wheels wastes the entire repair. If the plastic or metal bracket is fractured, even perfect wheels will pop out under stress. Run your finger along the mounting points — if you feel any flex or see hairline cracks, that housing needs reinforcement (epoxy and a small metal plate work) or replacement before the wheels go on.
Making Your Replacement Wheels Last: Maintenance Tips
New wheels don’t stay new unless you treat them like the mechanical parts they are — not indestructible rubber bumpers.
Clean them after every trip, especially if you’ve rolled through airport grime or city streets. Hair, thread, and those mystery sticky patches wrap around axles and gum up bearings faster than you’d think. I use a damp microfiber cloth and a toothpick to dig out the gap between wheel and housing. Takes two minutes per wheel. If you skip this, that fine grit works its way into the bearing and creates the grinding sound that means you’re already halfway to needing another replacement.
Lubricate every 6-8 trips, or whenever you hear the first hint of squeaking. Pop off the hubcap if your wheels have one, add one drop of silicone lubricant or dry PTFE lube to the axle, spin the wheel 10 times, wipe off the excess. Don’t use WD-40 — it’s a solvent, not a lubricant, and it’ll flush out the factory grease inside sealed bearings.
The one I’d actually recommend is 3-IN-ONE Multi-Purpose PTFE Lubricant, because the precision tip lets you hit the axle without oversaturating, and PTFE doesn’t attract dust the way oil-based lubes do. (→ OFFER: 3-IN-ONE Multi-Purpose PTFE Lubricant) One 4 oz bottle has lasted me through 30+ luggage maintenance sessions across three suitcases.
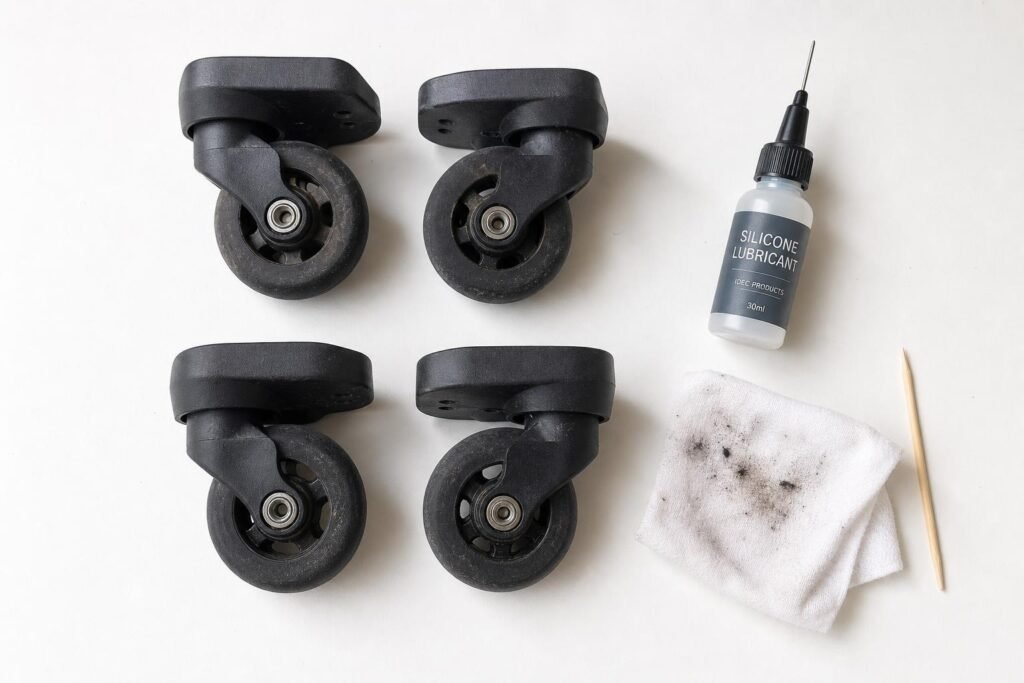
Shows the actual maintenance setup — wheels removed, cleaning debris visible on cloth, lubricant bottle with precision applicator tip.
How you handle the bag between trips matters as much as how you roll it. Storing luggage on its wheels for months puts constant pressure on one spot of the bearing race, creating flat spots. Stand it upright or lay it flat. When you’re lifting the bag into an overhead bin or car trunk, lift from the handle or body — yanking it up by grabbing the top while it’s resting on its wheels torques the axle mounts.
Avoid dragging the bag sideways or over curbs. Spinner wheels aren’t designed for lateral stress. If you need to cross a curb, tilt the bag onto two wheels or lift it entirely. I’ve seen axle bolts shear off because someone dragged a 50-pound bag sideways across a cobblestone plaza. The wheels didn’t fail — the mounting points did.
Consider wheel covers if you frequently check bags on airlines known for rough handling. They’re fabric or silicone sleeves that slip over the wheels before you drop the bag at check-in. Won’t stop a crushed housing, but they prevent scuffs and debris intrusion during the luggage conveyor chaos. I use them for international flights, skip them for domestic — purely based on how much my bag gets thrown around.
Check the axle bolts every few trips. Vibration loosens them over time. A quick finger-tightness test while you’re doing that post-trip cleaning catches this before a wheel rattles off. If you travel weekly, check monthly. If you travel monthly, check every 3-4 trips.
Wheels that get this level of attention last 3-5 years instead of 18 months. It’s not complicated maintenance — it’s just remembering that $15 wheels have moving parts that respond to basic care.